We went climbing today after checking on the bouldering wall at university, it is getting on nicely and will be up and running by the end of the exams (well hopefully).
The climbing went well and fun was had by all, we will be adding photos later on.
Remember those who want to go on winter skills you need to have paid by next Wednesday or you will not be going.
This blog contains the adventures of the Glasgow Caledonian University Mountaineering Club (GCUMC) and what we plan to do over the next few weeks. We go Climbing every week during university term time and every 2 weeks for Mountaineering Trips. At the end of each trip there will be a trip review alongside the photos taken on the trip.
Wednesday, 21 November 2012
Saturday, 17 November 2012
Climbing Update
We will be going climbing tomorrow at the Ibrox Climbing Center. We still have 6 spaces available for the trip.
There will only be climbing trips from now until the Winter Skills on 18th to 20th January. Normality resumes this week, there will be a weekly update on Wednesday.
Reminder - For those who haven't done winter skills we need to book the accommodation and the deadline is coming up fast. Please email in to let us know that you would like to go.
Friday, 9 November 2012
Boot Selection
Boot
selection is a bit of a contentious topic within the Club: boots are probably the single most important
item of clothing you will use out hillwalking, even more so for winter
mountaineering and walking. Keeping the
feet warm and dry is critical to physical ability and morale – support to the
sole of the foot and the ankle are exceptionally important on rocky ground and,
in winter, you can’t kick steps or wear crampons on soft soled
boots/shoes. Blistered feet make for
miserable days out and wet feet are more liable to be cold, blistered and
sore. A member of a walking/climbing
party with badly blistered and cold wet feet in Winter compromises everybody’s
safety. We have turned people away from
trips in the past because of unsuitable footwear and we will do it again – it
isn’t fair on everyone else.
However,
boots are also probably the single most expensive purchase you’ll make for your
hill walking gear and, when money is tight, is probably the first to be ‘cut
back’ on.
There are options: you can hire winter and 3-season hillwalking
boots at Tiso OE if you don’t want to buy some yet. Or maybe borrow some suitable footwear off a
friend.
It’s all
very well us telling you that you need ‘suitable footwear’ for Scottish
hillwalking but, what does that really mean?
For most of
the year, a pair of 3-season boots is adequate for hillwalking in Spring,
Summer and Autumn, and for LOW-LEVEL walks in Winter. However, as soon as Winter hillwalking and
mountaineering is on the cards, these are no longer safe. To wear crampons and kick steps, you need
boots with at least a B2 rating – this means supportive, warm and a stiff sole
that you cannot bend with your hands.
All boots should rated for suitability for winter use: if they don’t have a ‘B’ rating marked on the
label, they are probably B0 and are NOT for use in the hills in Winter. Wearing these in Winter in the Scottish
mountains puts you and – more importantly – the other people in your group at
risk.

3-season
leather boots

3-season
fabric boots (these Asolo Flame GTX are currently available for around £100 if
you look around)
So, a pair
of 3-season boots will be waterproof (very important in Scotland!), with a good
grippy sole and a high supportive ankle (ie, NOT a shoe!). They can be fabric or leather or a mix of
both but if they don’t look like much the ones in the pictures above, you’re in
trouble! For a decent pair of 3-season
boots, you are looking at from £90 upwards with sale prices. Anything less than this is very unlikely to
be suitable, and most boots will be a lot more expensive. “Trekking” boots are generally not designed
for hillwalking so be very careful if you are offered these – always ask if
they are 3-season and are suitable for Scottish hillwalking, and if the sales
assistant doesn’t know, leave them alone.
Always get boots in the sales or at a discount – never pay full price
for any outdoor kit! And try to get them
from proper outdoor shops like Tiso, Cotswold Outdoor, Nevis Sport, etc.
4-season
Winter boots generally come as either thick leather (La Sportiva Nepals, Scarpa
Mantas, etc), modern fabric boots (usually with a Goretex liner, or similar)
and plastic double boots (eg, Scarpa Omegas or Vegas, Asolo, Kofflack). They usually have insulation to keep your
feet warm and a stiff sole which you can hardly bend at all with your hands –
this means they will be stiff enough to kick steps and take a crampon. The stiff sole also supports your calves when
front-pointing on crampons. It is normally recommended that if you have a pair of these all singing all dancing boots that you use approach shoes on the walk in due to the fact that you will most likely be tired out quicker and in a bit more pain due to the lack of flex in the boots
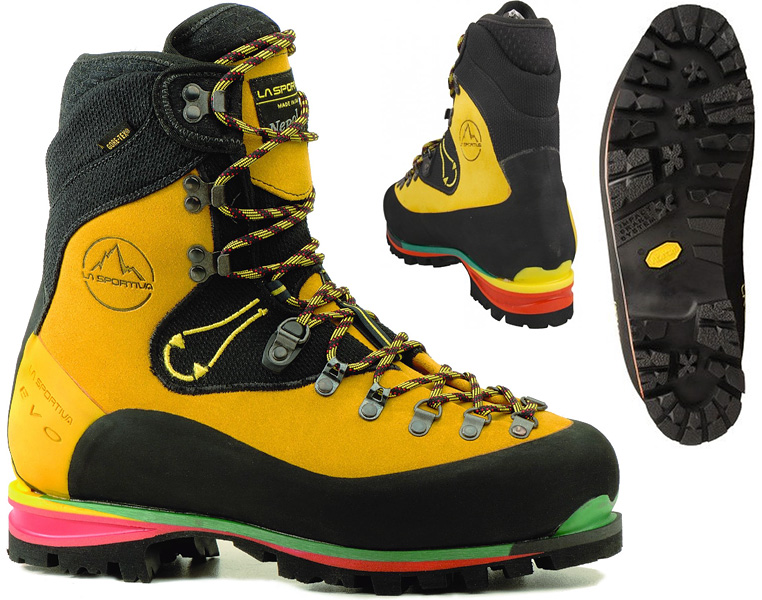
Thick
Leather, B3 La Sportiva Nepals (compulsory for mountain guides!)

Classic Scarpa Vega Double Plastic Boots
Winter boots
are expensive, no doubt: anything from
£180 upwards new for something like a pair of Scarpa Mantas in the sales. You can get some bargains on eBay if you know
what you’re looking for, especially plastic boots and you can pick up a pair of
indestructible Scarpa Vegas for about £25-£30.
However, winter boots (and especially plastics) can be very rigid and it
is sometimes a bit like walking in ski-boots.
So, always try out something similar so you can gauge the fit and
comfort before you buy. Again, Tiso will
hire out winter boots and many people just do this all winter rather than buy
them.

Scarpa
Mantas – Possibly the most popular 4-season boot.
So, please
don’t pitch up with crap boots, trainers or walking shoes or we’ll send you
home again – especially in Winter.
If you’re
worried about footwear and want some advice, feel free to ask some of the more
experienced Club members.
Wednesday, 7 November 2012
Weekly Update
The climbing went well today, we have a few more members and a few who are looking to take their test next time. The photos taken today have been added to the bottom of this post, the teaching took place in the beginning and then we developed on what was taught throughout the day.
We have had to cancel the abseil on Sunday and hope to have rearranged it for the following Saturday (17th November) - Remember to let us know if you are interested in coming and then we wont have to cancel again.
We will be continuing climbing over the next few weeks as normal.
We have had to cancel the abseil on Sunday and hope to have rearranged it for the following Saturday (17th November) - Remember to let us know if you are interested in coming and then we wont have to cancel again.
We will be continuing climbing over the next few weeks as normal.
Care for Waterproofs
Care Of Your Clothing
After a hard day on the hill, whether it’s summer or winter, it’s easy just to
throw your dirty kit in the bottom of the cupboard until next time it’s needed.
However, you really need to look after your kit if you want it to look after you.
It may seem like a pain in the arse to have to clean and sort your clothing and
boots but it’s far better you spend 30 minutes on it at home than to be sat out
in the cold as the water seeps into your clothing and the wind chill starts to
bite…
Waterproofs
Ignoring waxed garments like Barbour jackets, hillwalking waterproof jackets,
trousers and gaiters work in either one of two ways:
a.
These are often known as hard-shell layers and usually consist of a
porous membrane bonded to a protective outer layer which is treated
with a Durable Water Repellent (DWR) coating. The membrane has
tiny holes in it which are large enough to allow water vapour from your
sweat to exit but small enough to stop water droplets coming in. The
DWR causes rain to ‘bead’ – look at it on your own waterproof – and
run off without soaking into the outer layer. These types of waterproofs
are the most popular and come in many different ‘flavours’, weights
and varying levels of ‘robustness’.
b.
Fabrics like Paramo Analogy have two non-bonded layers: the inner
one pumps water away from the skin using a one-way capillary action,
this then passes out though the thinner face fabric which will have a
DWR coating to stop water coming back the other way. These kind of
garments tend to be warmer, heavier and more expensive but can be
repeated reproofed and repaired with a needle and thread, are often
more hardwearing and last longer than hard-shell membrane clothing.
When you come back from a hill day, wipe the mud and dirt off your
waterproofs using a sponge or cloth and some cold water – no soap! If they
are absolutely filthy, you need to wash them – dirt clogs the membrane or
face fabric so it doesn’t ‘breathe’ anymore. Whatever you do, DO NOT USE
A NORMAL WASHING DETERGENT LIKE DAZ, ARIEL, ETC! The reason
is that these will strip the DWR coating off your waterproofs straight away.
You’ll know the DWR coating is gone when water doesn’t bead on the surface
anymore and just soaks in – or ‘wets out’ as it’s usually known.
So, what do we do to clean and reproof our waterproofs? First of all, you can
either wash them in a washing machine or handwash in a bucket/sink/bath.
If you use a machine, take the detergent tray out first, wash it, wash the hole
in the machine it goes into and rinse it all through. Then run the machine
Membranes (Goretex, Event, Drypoint, Hyvent, Sympatex, etc).
Pumpliners
empty on a hot cycle to clear out any remaining detergent. You then have a
choice: either use a specially made soap like Nikwax Techwash or Granger’s,
use pure soap flakes (which I have always found difficult to get hold of) or,
buy some plain simple unperfumed soap and grate about 1/3 of a bar with a
cheese grater. Don’t use the grated soap in the washing machine, only for
handwashing or it will foam everywhere and your kitchen looks like an Ibiza
Club Night.
Once washed (use the temperature and wash cycle indicated on the label or,
if there isn’t one, usually a 30-40 degree standard wash will do), drip dry or
put in the tumble dryer on a warm setting – not hot. The warm tumble dryer
will actually help reactivate the DWR coating if there’s any left.
If the waterproof is wetting out, it’s time to put that DWR coating back on!
This is usually using a wash-in or a spray-on fluid like Nikwax or Grangers.
Again, you can either handwash or use a machine but take the same
precautions as before and get rid of any detergent still in the machine first.
You can drip dry the clothes afterwards but you’re better off with a warm
tumble dryer as this helps activate the DWR chemicals.
Boots
Get rid of as much dirt from the upper and sole of the boot as you can –
maybe wash them off under the tap or shower. Dry your boots naturally –
ie, not on the radiator! This damages the fabric or rubber, especially if the
boots are leather (it will crack and split). Take out the insoles, undo the laces
and open out the boots. Stick some scrunched-up newspaper in too to help
absorb water – change it regularly.
Once they are dry, use a stiff nylon scrubbing brush to get rid of mud and dirt
from the uppers and then either reproof using a leather conditioner or a boot
proofer from Grangers or Nikwax. Store them somewhere cool and dry.
Fleeces/Technical Layers/Softshells
Basically, wash sweat and dirt out of them so they don’t stink and still
wick sweat away from your body – they won’t if they’re dirty! Follow the
instructions on the label. If you have trousers/jackets which are water
repellent (softshell perhaps), you may need to wash and reproof them with
your waterproofs.
Summary
Basically, don’t just chuck everything in the washing machine. At very least,
wipe your waterproofs down with a wet cloth/sponge and cold water.
STUDENT ON THE WAY OUT TO THE PUB RAPID SUMMARY
Look after your kit if you want it to look after you.
Don’t wash your waterproofs with normal detergent. Use a pure soap and a
reproofing liquid.
Don’t dry your boots by the radiator. Brush the mud off your boots when its
dry. Use a reproofer every now and again.
Wash your fleeces, technical layers, etc, so that they don’t smell, they feel
nice, and they breathe properly.
Saturday, 3 November 2012
Ben Vane Review
The Ben Vane trip went well, everybody took something from the Trip.We didn't make it to the top because the terrain was too risky under foot without ice axe and crampons, as most of the members were not winter skills trained we decided enough was enough. Everybody seemed to enjoy a taste of winter and a little scrambling.
It was quite disheartening calling it off when we were 75m from the summit but it was the right call.
Here is a list of today's events and photos:
At 8:30AM we left the Gear Store to Inveruglas
We then arrived and got ready for the day ahead, also we had a look at the view from the car park.
We then set off on the walk and right out the car park as on the map the power plant came into view.
The Group are looking forwards to a day on the hill as we walk past the power plant.
We join the track that we will follow until we reach the path. It is a relatively long walk in.A fence surrounding some transformers comes into view, looks like the distribution for the power plant.
We meet some cows just past the power station.
Ben Vane comes into sight with more snow than expected.
Group photo on the path before the long ascent.
The group stop for a rest and admire the snow on the mountain.
Its starting to get a little dark but then looking up there is a huge dark cloud above us.
We then went into Arrochar for some well deserved chips and then went home.
We hope everyone enjoyed it and aren't too discouraged by not being able to get a munro bagged, as Hervey Voge said "The mountains will always be there, the trick is to make sure you are too".
We will be having a meeting on Wednesday and then going climbing later on. We will be finalizing the details for the sponsored abseil soon.
Friday, 2 November 2012
Last Weather Update for Tomorrow
Now that we have a more accurate forecast form MWIS, we will ignore the Met Office as this is a broader forecast for looking at what the weather systems are doing and what is coming our way.
As we can see from this forecast we have an improved forecast as the low pressure has moved North-West rather than West. This has resulted in less winds and a higher chance of a cloud free munro. However the freezing level has remained the same meaning that it will be a cold day.
Due to these conditions we will be hoping to get the top but be prepared to not summit if the conditions under food do not allow without ice axe and crampons.
Thursday, 1 November 2012
Weather Update for Saturday
There is some bad news with this update, the weather is not looking the best.
Considering the Surface Pressure Chart (http://www.metoffice.gov.uk/weather/uk/surface_pressure.html), we get an increase in the wind from morning to afternoon as a low pressure will be moving in. Using the rough rule of thumb that for every isobar covering the uk that is 10mph of wind we get the wind increasing from 30mph (top image) to 60mph (bottom image):
Then if we consider the more detailed MWIS forecast (http://www.mwis.org.uk/wh.php and below), we can see that the winds range from 30mph to 45mph in the morning to 60mph gusts in the afternoon. In this case the rule of thumb was relatively accurate but it is a very rough estimate most of the time. There are also snow showers forecast and the cloud base and freezing level at 700m with only a 10% chance of a cloud free munro.
It will most likely be a taste of what is to come in the winter, so everyone remember to suit up and be nice and warm. We will play it by ear as to what we do when as we can not estimate how the group will respond to the conditions or what the exact conditions will be like.
Subscribe to:
Comments (Atom)